
At a glance
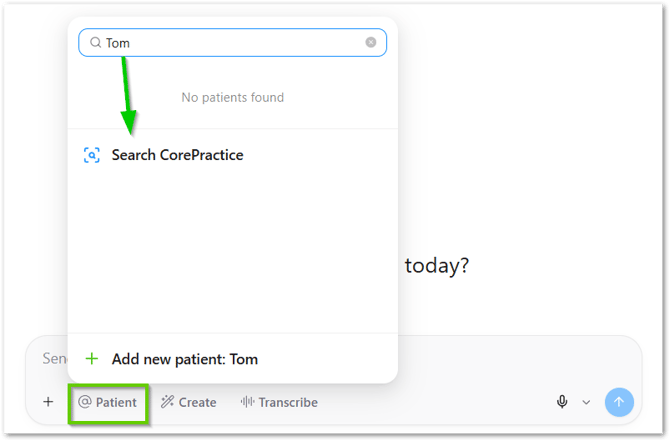
- Starting a Session - add or search for your patient.
- Recording With Transcribe - start, consult as normal, stop.
- Generating a Patient Letter and Clinical Note - tick, generate, open.
- Importing Images and Synced Treatment Plans - bring these in before building a Case Presentation.
- Generating Before-and-After Previews - turn an imported image into a before-and-after.
- Creating a Case Presentation - a guided, priced proposal built from the session.
- Sending a Care Pack - preview, then send by SMS or email.
- Copying Clinical Notes Into Your Practice System - paste-ready, with formatting options.
- Choosing Between a Patient Letter and a Case Presentation - which one fits the case.
Starting a Session
- Click + Patient (also shown as just Patient in some places - they're the same button).
- Search for your patient.
- Select the correct patient to open their session.
This walkthrough assumes an integrated practice account. If your practice isn't yet integrated with a practice management system, you won't be able to search your practice system directly or import synced images and treatment plans (Section 4) - everything else below still applies.
If your account is integrated, click Search, then choose your practice system from the list to search for the patient there directly, rather than entering their details manually.
Recording With Transcribe
- Click Transcribe - recording starts immediately.
- Let your patient know you're recording, then let it run in the background for the rest of the appointment.
- Click Stop when you're done.
Generating a Patient Letter and Clinical Note
- After you stop the transcription (previous section), tick the Patient Letter and Clinical Note boxes.
- Click Generate Selected.
- After a few seconds, open the finished documents from the Generated links, or the icons on the right-hand side of the session.
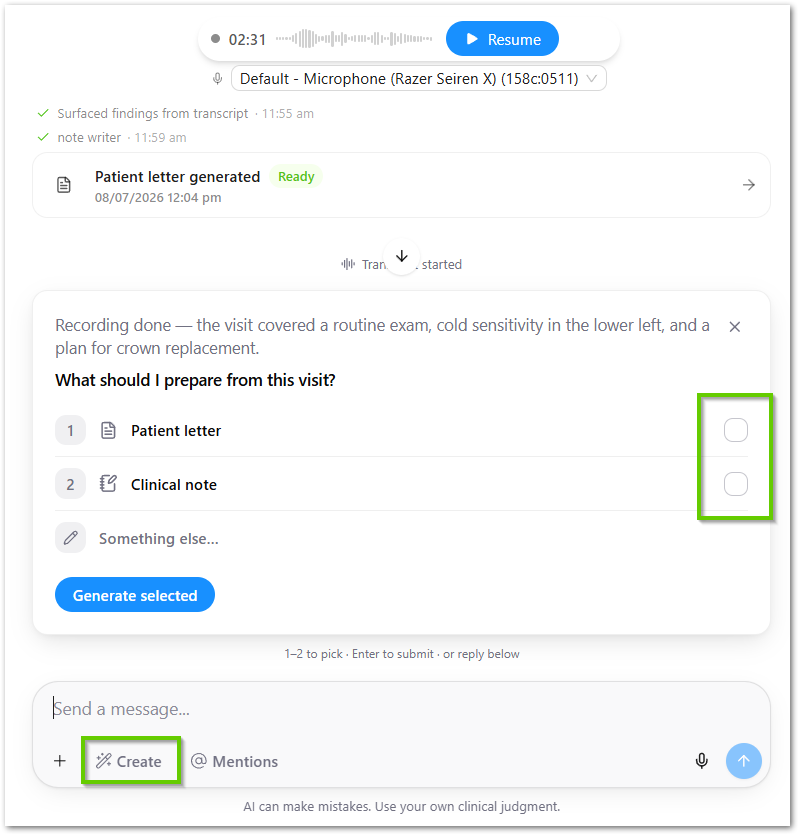
Use the Create button in the chat bar to generate anything else if your desired options are not displayed.
Importing Images and Synced Treatment Plans
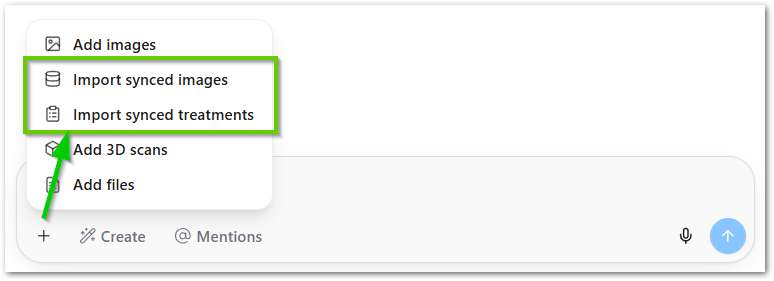
Case Presentation and Generate Image both live in the chat bar at the bottom of the session, under Create (also labelled Generate in places). Before building a Case Presentation, import the patient's images and treatment plan first:
- In the chat bar, click the + icon.
- Click Import Synced Images and Import Synced Treatment Plan.
- Click the blue button, or press Enter, to bring them into the session.
Generating Before-and-After Previews
Once your images are imported and analysed, you can generate before-and-after previews from them.
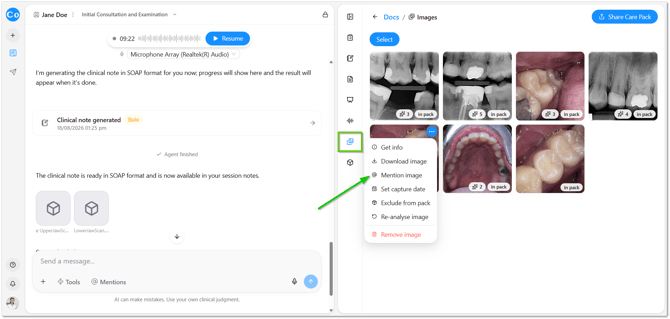
- Click the image icon on the right-hand side to bring up the session's images.
- Hover over the image you want, and click the three dots in its top right corner.
- Click Mention Image.
- Back in the chat bar, click Create, then Generate Image, and describe what you'd like to generate.
Be specific - the more precise your description, the more precise the result. Trying to generate everything at once can confuse it. A few examples:
- "Generate a preview of porcelain veneers on the top six teeth, leave the rest unchanged."
- "Preview of a crown on the tooth requiring restoration, leave the rest unchanged" - for crowns, mention the material.
- "Generate an implant plan preview on the tooth requiring implant" - mention the specific tooth number if you have it, for accuracy.
Creating a Case Presentation
- Click Create, then Case Presentation.
- Type in what you need - for example, "for crowns," "for an implant," or "for veneers" - plus any specific details to include, then press Enter.
- Answer the guided questions as they come up. This includes the tone the presentation should take - warm and reassuring, clinical and detailed, or short and to the point (a good moment to factor in a patient's DISC personality profile, if you use one) - plus anything like payment options or timeline that differs from what you'd usually do for a case like this.
- Review the finished presentation before sharing it with your patient.
Where nothing's entered, Chairside falls back on standard dental procedure information and what was discussed in the transcription.
Sending a Care Pack
- Click Share Care Pack in the top right.
- Preview exactly what your patient will see, and tick or untick the sections to include - patient letter, case presentation, images, and so on.
- Choose SMS or email, check the message (it's customisable), then click Send.
Copying Clinical Notes Into Your Practice System
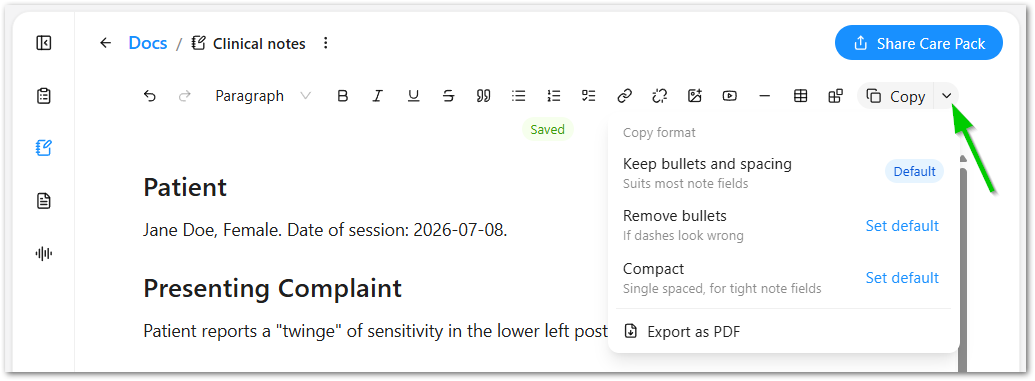
- Click Copy in the top right to copy the clinical note.
- Click the arrow next to it for formatting options: Keep bullets and spacing (default), Remove bullets, or Compact (single-spaced, for tight note fields). Any of these can be set as your new default from the same menu.
Choosing Between a Patient Letter and a Case Presentation
- Patient Letter - shorter: a summary of the visit and next steps. Can still include before-and-after previews or images. Good for most straightforward visits.
- Case Presentation - a full proposal. Use it for incomplete treatment plans, or a patient who's on the fence - not something you need for every pack you send.
Some dentists only use their first session for the clinical note - but ideally, aim to send at least a Patient Letter to every patient, or a full Case Presentation for anyone with incomplete treatment.