
Your case presentation template tells CoTreat how to turn a consult into a clear, personal presentation for your patient. CoTreat includes a ready-made Case presentation template, and you can copy it and shape it around how your practice talks to patients: your tone, who patients should contact, your payment options and the sections you want patients to see.
This guide is for anyone setting up templates for the team, such as treatment coordinators, front desk teams and practice managers. Once a template is set up, it's filled in automatically for each patient.
In this article
- How Case Presentation Templates Work
- Copying the Case Presentation Template
- Setting the Tone
- Adding Your Practice Details Once
- Editing, Adding and Removing Sections
- Using Widgets
- Including Images
- Using Our Detailed Example Template
- Saving Your Template
- Getting Help
How Case Presentation Templates Work
A template is made up of a few building blocks. You don't write the presentation itself. You write short instructions, and CoTreat uses them to write each patient's presentation from their consult, treatment plan and images.
- Tell CoTreat how it should read: the box at the top. Describe the tone and style you want. It applies to every section.
- Headings: the section titles patients see, such as Where You Are Now or Your Investment.
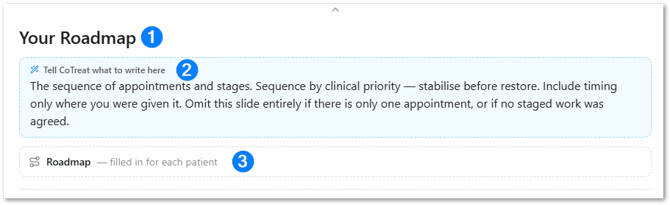
- Tell CoTreat what to write here: the blue boxes that explain what goes in each section, where the information comes from and when to leave the section out.
- Widgets: ready-made visual blocks (Roadmap, Treatment options, Investment and Payment plans), marked filled in for each patient.
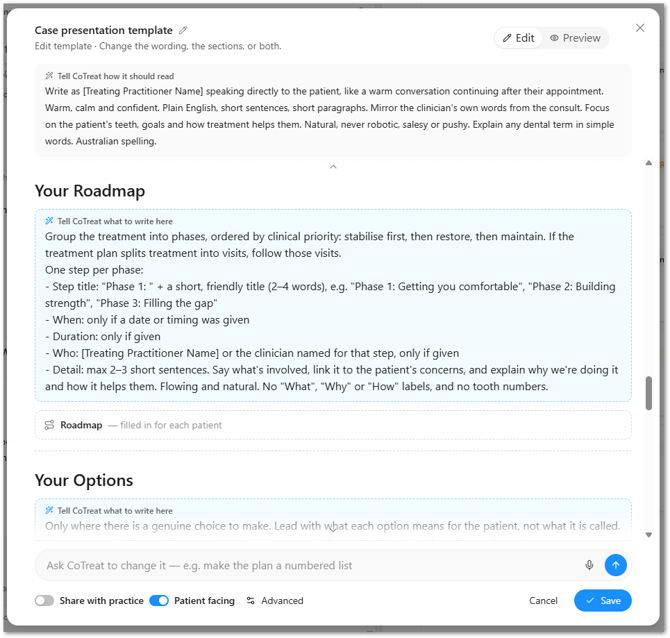
Copying the Case Presentation Template
Every case presentation template starts as a copy of CoTreat's Case presentation template. It already has the sections, instructions and widgets a presentation needs, so you only need to change what's different for your practice.
- Go to Create and click New template.
- Select Copy an existing template.
- On the left, under From CoTreat, select Case presentation. A preview of its sections appears on the right.
- Click Copy and edit. This makes your own copy, and the original stays as it is.
- Work through each section: replace the headings and instructions with your own, remove any sections you don't need, and add new ones where needed.
- Click Add template to save it. It now appears under Yours.
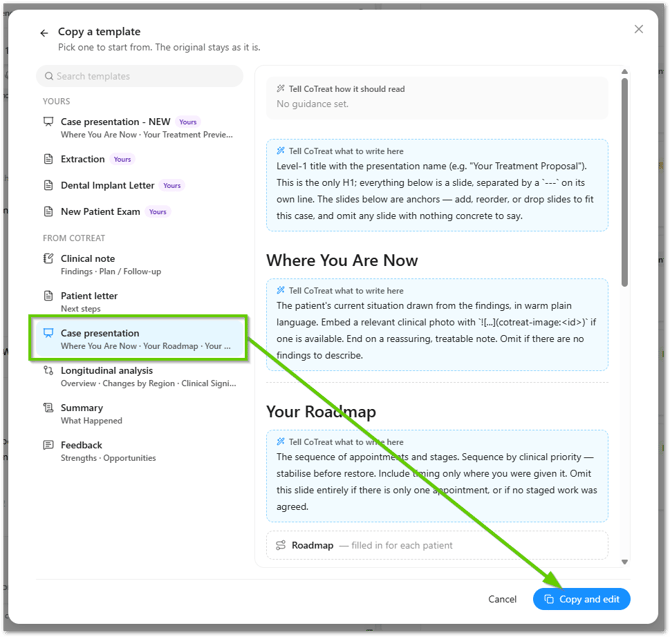
The Case presentation template includes these sections, which you can keep, change or remove:
- Title: the presentation name, e.g. "Your Treatment Proposal".
- Where You Are Now: the patient's current situation, in plain language.
- Your Roadmap: the sequence of appointments, with the Roadmap widget.
- Your Options: the treatment choices, with the Treatment options widget.
- Your Investment: the itemised cost from the treatment plan, with the Investment widget.
- Payment Options: ways to pay, with the Payment plans widget.
- Further slides: an instruction to add extra slides when the case calls for it, such as Your New Smile, What To Expect or Your Team.
Want something more detailed? See Using Our Detailed Example Template further down for ready-to-paste text for every section.
Building more than one presentation style, such as one for implants and one for clear aligners? Make a separate copy of CoTreat's Case presentation template for each. Then test it on a recent patient and adjust one thing at a time.
Setting the Tone
In Tell CoTreat how it should read, describe how you'd like the presentation to sound. Write it the way you'd brief a new team member. For example:
Write as [Treating Practitioner Name] speaking directly to the patient, like a warm conversation continuing after their appointment. Warm, calm and confident. Plain English, short sentences, short paragraphs. Mirror the clinician's own words from the consult.
Focus on the patient's teeth, goals and how treatment helps them. Natural, never robotic, salesy or pushy. Explain any dental term in simple words. Australian spelling.
Adding Your Practice Details Once
Some details are the same for most patients, such as who to contact and the payment options you offer. Instead of typing them into several sections, put them in one blue box at the top of your template. When something changes, you only update it in that one place.
Your practice name, address and contact details, and the treating dentist's name, are filled in automatically. You don't need to add them.
Step 1: Find the first blue box
All instructions sit in blue boxes. You'll put your practice details in the first blue box, just under Tell CoTreat how it should read.
- If there's already a blue box at the top (there will be if you copied CoTreat's Case presentation template): click inside it, highlight all the text, and delete it.
- If there's no blue box at the top: click Click to add a line and choose Instruction. A new blue box appears. Drag it to the top if needed.
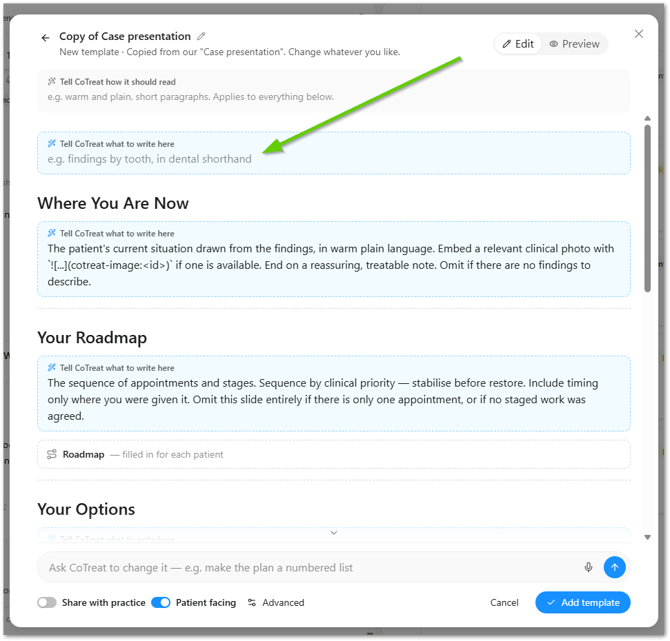
Then copy the text below and paste it into that blue box.
Step 2: Change the details to your own
The text shows example details. Replace them with your own, changing only the words after the colon (:). Leave everything else as it is. To hide something, such as the email, just leave it blank.
- Contact person: whoever patients should call about their treatment, such as your treatment coordinator or reception. If the dentist names someone else in the consult, CoTreat uses that person instead.
- Payment options: change, add or delete options to match what your practice offers. To add one, copy a whole option and paste it underneath. To remove one, delete the whole option.
- Amounts in {curly brackets}: CoTreat works these out from the treatment total. You can change the number inside, e.g. {5% of total} to {10% of total}.
MY PRACTICE DETAILS
Use the details below in every section. Use them exactly as written.

CONTACT PERSON
(Who patients should contact about this presentation. If the dentist names someone else in the consult, use that person instead.)
Name: Jenny
Role: Treatment Coordinator
Phone: (02) 9123 4567
Email:

SIGN-OFF
Closing: Warm regards,
Signed by: [Treating Practitioner Name] and the [Practice Name] team

PAYMENT OPTIONS
Intro line: We offer these to make treatment easier to fit around your life and budget.

Option 1
Title: Pay upfront
Headline: 5% discount
Note:
Row 1 label: Total savings
Row 1 amount: {5% of total}
Row 1 description: When paid in full before treatment starts
Row 2 label: You pay
Row 2 amount: {total minus 5%}
Row 2 description: One simple payment
Show this when: there is a price

Option 2
Title: Payment plan
Headline: Pay over 12 months
Note: Subject to approval.
Row 1 label: Monthly
Row 1 amount: {total ÷ 12}
Row 1 description: Equal monthly payments
Row 2 label: Balance
Row 2 amount: 12 months
Row 2 description: Paid over time
Show this when: there is a price

Empty lines are left out. Never make up amounts, dates or providers.
Step 3: Use your details in other sections
Other sections, like Next Steps, can use these details too. In their blue box, just write "from My Practice Details" instead of typing the name or phone number again. For example:
Ask the patient to contact the Contact Person from My Practice Details.
Show their name, role and phone number.
End with the Closing and Signed by lines from My Practice Details.
Don't type a name or phone number straight into any other blue instruction box. If you do, it won't change when you update My Practice Details.
Editing, Adding and Removing Sections
Changing a section
Click any heading or blue box to edit it. You can rename headings to suit your practice. To reorder sections, drag them up or down.
Adding a section
- Hover where you'd like the new section, such as between two sections, and click the + icon. You can also click Click to add a line at the bottom of the template.
- Choose what to add: Instruction (a blue box), Heading, Image, Video, Widget or More.
- Type in what you'd like the section to include.
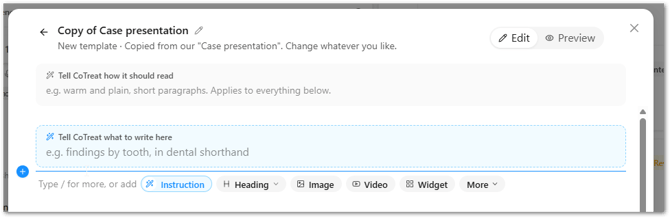
Removing something
- Heading: click into it and press backspace until it's deleted.
- Blue box: hover over the box and click the bin icon on the right.
- Widget: hover over the widget and click the bin icon on the right.
Writing good instructions
Each blue box works best when it covers three things:
- What to write: e.g. "The patient's current situation in warm, plain language."
- Where it comes from: e.g. "Prices from the treatment plan only. Never estimated."
- When to leave it out: e.g. "Leave this section out if only one treatment was discussed."
If a section shouldn't appear for every patient, always say when to leave it out in its blue box. Otherwise, CoTreat may still show it.
You can also type a request into Ask CoTreat to change it at the bottom of the editor, such as "make the plan a numbered list".
Using Widgets
Widgets present information in a consistent, visual way and are filled in for each patient.
- Treatment options: shows the options side by side. Each option has an option ID (e.g. Option A), label, one-sentence summary, short detail and price, and you can mark the recommended option.
- Roadmap: shows the visits or phases step by step. Each step has a title, when, duration, who (the dentist involved) and a short description.
- Investment: shows the itemised fees and total. Each option has a title, item names and prices, and a total.
- Payment plans: shows the ways to pay. Each option has a title, headline, an optional note, and rows with a label, amount and description (e.g. Upfront · 50% · Due at start of treatment).
The Investment widget can't highlight a recommended option on its own. If you mark one in Treatment options, add an instruction to put "(Recommended)" at the end of that option's title in the Investment widget too.
Always add the blue box before the widget, in this order: heading, then blue instruction box, then widget. The blue instruction box tells CoTreat how to fill the widget. If the widget comes first, it may not fill in correctly.
Including Images
CoTreat can automatically add images from the patient's session to the presentation. Images synced from your practice system usually have a type (Bitewing, Intraoral, Arch or Generated) and a capture date. Generated images are created by CoTreat, such as smile mock-ups and previews of crowns or implants.
To include images, say in the blue box which type to use and where. For example:
Include the Generated before-and-after preview image with the most recent capture date.
Directly below it, add this caption:
AI-generated preview: a visual guide to your treatment, not the exact final result.

If the dentist mentioned a bitewing, X-ray or intraoral photo, include the most recent one of that type.
If none were mentioned, don't include an image here.
Using Our Detailed Example Template
Want something more structured? Below is a detailed example you can copy, section by section, into your own copy of the Case presentation template. Use as much or as little of it as you like.
Before you start
- Add My Practice Details to the first blue box (see Adding Your Practice Details Once).
- Copy the text below and paste it into the same first blue box, underneath My Practice Details. It tells CoTreat the general rules for the whole presentation.
RULES
- Follow "How it should read" for all wording.
- Use ONLY the consult transcript, practice profile, treatment plan, session images and My Practice Details. Don't invent diagnoses, options, steps, dates, people, fees, benefits or promises.
- Text in [square brackets] is a placeholder. Replace it with the matching details. If it can't be filled, leave it out. Never show an empty placeholder.
- Use the section headings exactly as they appear in the template.
- If a section has nothing to show, leave out the whole section: heading, text and widget.
- If something needed in a section wasn't discussed, write [Not discussed – please add].
- Tooth numbers are only allowed in the Treatment options and Investment widgets. Everywhere else, describe teeth the way a patient would, e.g. "your top front tooth".
- Don't repeat information across sections.
- Fill each widget using the blue box just above it. Don't write widget content as plain text.

IMAGES
- Use images from this session. Each has a type (Bitewing, Intraoral, Arch or Generated) and a capture date.
- Generated images go ONLY in the treatment preview section. Bitewing, intraoral and arch images go ONLY in the current condition section.
- If there's more than one image of the same type, use the one with the most recent capture date.
- Never use the same image twice. If there's no matching image, leave it out without mentioning it.

PRESENTATION APPROACH
- Lead with the patient: their goals and concerns first, then the clinical picture, then the plan, then the investment.
- Show before you tell: use images to help the patient see the problem and the result.
- If the dentist explained what could happen if treatment is delayed, carry that through clearly and kindly. Never add consequences the dentist didn't mention.
- Value before price: explain why treatment matters before showing any fees.
- Break big plans into phases so they feel manageable.
- End with one clear, easy next step. Caring, never pushy.
Then, for each section
- Make sure the section has the heading shown. If it's not there, hover where it should go, click the + icon and choose Heading, then add a blue box (Instruction) underneath it.
- Click into the blue instruction box under the heading, highlight all the text, delete it, and paste in the example text.
- If a widget is listed, check it sits under the blue box. If it's missing, hover under the blue box, click the + icon, choose Widget and select the relevant widget.
The sections are listed in the order we recommend. Change any of the wording to suit your practice, and remove any sections you don't need.
Where You Are Now
Heading: Where You Are Now
Widget underneath: No widget
This is the current condition section.

Opening
- Greet the patient by [Patient first name].
- Briefly recap what [Treating Practitioner Name] discussed, in their own words where possible.
- Mention the patient's goals or concerns, only if they came up in the consult.

Images
Check the consult for any images the dentist mentioned:
- "Bitewing", "X-ray" or "radiograph" → include the Bitewing
- "Intraoral photo" or "photo" of a tooth or area → include the Intraoral photo
- "Arch photo" or a photo of the whole top or bottom teeth → include the Arch photo
Include one image (most recent capture date) for each type mentioned. If none were mentioned, don't include an image here.

Current situation
- In plain English: what the dentist found, the patient's main concerns, and why treatment was recommended.
- If the dentist explained what could happen without treatment, include it briefly and kindly.
- If the roadmap section is left out, add one short paragraph on what we'll do, why, and how it helps.
- End on a reassuring note.
Your Treatment Preview
Heading: Your Treatment Preview
Widget underneath: No widget
This is the treatment preview section. It helps the patient picture the treatment discussed, e.g. a smile mock-up or crowns or an implant in place.
Only include this section if there's a Generated image from this session. Otherwise leave it out completely.

- Include each Generated image that relates to a treatment discussed. If several show the same thing, use only the most recent. Up to 3, in the order of treatment.
- Directly below each Generated image, add this caption:
 *AI-generated preview: a visual guide to your treatment, not the exact final result.*
- Above the images, write 1–2 warm sentences linking what they'll see to the patient's goals, e.g. "Here's a look at what we talked about, so you can picture it for yourself."
Your Options
Heading: Your Options
Widget underneath: Treatment options
This is the options section. Only include it when there are two or more real treatment choices (e.g. Option A and Option B). If there's one clear plan, leave out this whole section.

Fill the Treatment options widget with one entry per option discussed, in the order discussed:
- Option ID: Option A, Option B, etc.
- Label: the option name
- Summary: one sentence on what this option means for the patient, not just what it's called
- Detail: short, shorter than the summary (tooth numbers are fine here)
- Price: from the treatment plan
- Recommended: mark the option the dentist recommended (only if they recommended one)
Never present doing nothing as an equal choice to treatment.
Your Roadmap
Heading: Your Roadmap
Widget underneath: Roadmap
This is the roadmap section. Only include it if treatment was agreed across more than one appointment. Otherwise leave out this whole section.

Fill the Roadmap widget. Group the treatment into phases, most urgent first: first get the patient comfortable, then restore, then maintain. If the treatment plan splits treatment into visits, follow those visits.
One step per phase:
- Step title: "Phase 1: " plus a short, friendly title, e.g. "Phase 1: Getting you comfortable", "Phase 2: Building strength", "Phase 3: Filling the gap"
- When: only if a date or timing was given
- Duration: only if given
- Who: [Treating Practitioner Name] or the dentist named for that step, only if given
- Detail: 2–3 short sentences. Say what's involved, link it to the patient's concerns, and explain why we're doing it and how it helps. No tooth numbers.
Your Investment
Heading: Your Investment
Widget underneath: Investment
This is the investment section. Leave out this whole section if there are no prices.

Write 1–2 sentences that frame the investment around the patient's teeth and the result. For larger treatments, reassure them and welcome questions.

Fill the Investment widget. Prices come from the treatment plan only. Never estimate. The only exception is a price the dentist clearly said in the consult. Don't change or round any figures.

Entries:
- One plan with phases: one entry per phase, titled the same as the roadmap, e.g. "Phase 1: Getting you comfortable".
- One plan, no phases: one entry with a simple treatment name.
- More than one treatment option: one entry per option, e.g. "Option A: Implant". Add "(Recommended)" to the end only if that option is marked Recommended in the options section.

Items:
- If the treatment plan splits items into visits: "Visit 1: " plus the treatment, e.g. "Visit 1: Root canal". No tooth numbers.
- If not: the treatment plus tooth number, e.g. "Root canal (36)".
- Price for each line, then the Total.
Payment Options
Heading: Payment Options
Widget underneath: Payment plans
This is the payment section. Leave out this whole section if there are no prices, or if none of the payment options in My Practice Details should be shown.

Write the Intro line from My Practice Details.

Fill the Payment plans widget with each payment option from My Practice Details, in the same order. Skip any option where "Show this when" isn't true.
- Title, Headline and Note: exactly as written. If Note is empty, leave it blank.
- Rows: use each row's label, amount and description exactly as written. Work out any amount in {curly brackets} from the treatment total. Show dollar amounts to the cent, e.g. $522.00.

Which total to use:
- One plan: the full treatment total (add up the phases if needed).
- More than one treatment option: repeat the worked-out rows for each option, in the same order as the investment section. Start each label with the option, e.g. "Option A: Monthly".
Never estimate.
Next Steps
Heading: Next Steps
Widget underneath: No widget
This is the next steps section. Contact and sign-off details come from My Practice Details.

- Give 2–3 short numbered steps. Make the important words bold, e.g.:
 1. **Have a read** and jot down any questions.
 2. **Contact [Contact Person's name], our [Role],** to book in or chat through your options.
 3. **Your first visit:** [next appointment]. Only include this if the dentist mentioned it.
- Show a contact card: the Contact Person's name and role, their phone number in bold, their email if given, then [Practice Contact Details].
- Add a short, warm note from [Treating Practitioner Name] that links back to the patient's goals.
- End with the Closing and Signed by lines from My Practice Details.
[Screenshot: The detailed example template, showing each heading, its blue box and widget]
Saving Your Template
- Click Preview to check how your template looks.
- Choose your settings at the bottom of the editor:
- Share with practice: when on, everyone at your practice can use this template. When off, only you can.
- Patient facing: turn this on so the document can be added to a care pack. You still choose what to include each time you share.
- Click Add template. If you're editing a template you've already added, this button says Save instead.
[Screenshot: Share with practice and Patient facing toggles with the Add template button]
Getting Help
The best way to learn is to try it: copy the Case presentation template, change one section, and run it on a recent patient to see the difference. If you'd like a hand setting up your template, email us at help@cotreat.com.au.