
Copy CoTreat's Case presentation template, add your practice details, and every presentation after that is personal, clear and in your practice's voice.
A case presentation is a fuller treatment proposal for bigger decisions, such as a patient still on the fence about treatment. It shows their options side by side, the visits ahead, the investment and ways to pay. For a short summary after any visit, use a patient letter instead.
Other template guides:
In this article
- Quick Setup (5 Minutes)
- Making It Sound Like You
- Adding Recommended Sections
- Using Widgets
- Common Questions
- Getting Help
Quick Setup (5 Minutes)
- Copy the template: click Create > New template > Copy an existing template. Under From CoTreat, select Case presentation and click Copy and edit.
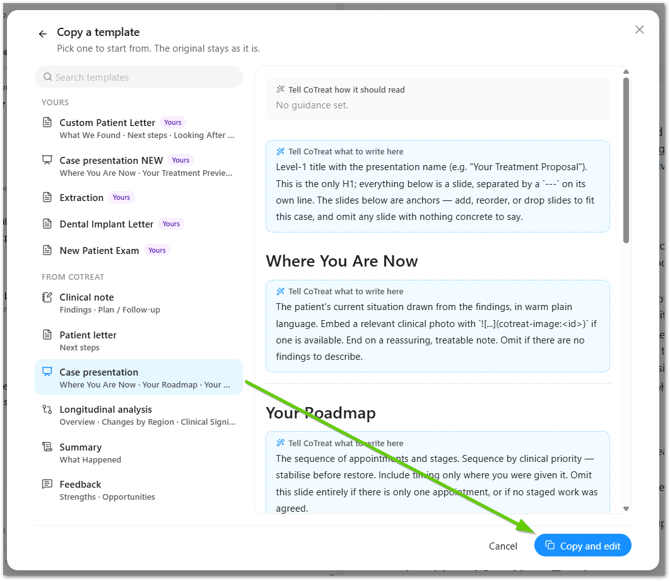
- Add a blue box at the top: click Click to add a line > Instruction. This adds a blue instruction box (we call these blue boxes). Drag it to the very top.
- Paste your details: copy the box below and paste it into that blue box.
- Fill in the [CAPITALS]: your contact person, phone, booking link, payment options and closing. Delete lines you don't need.
- Save: name the template, turn on Share with practice (optional) and Patient facing, and click Add template.
MY PRACTICE DETAILS
Change the words in [CAPITALS]. Delete any line you don't need. Any line still showing [CAPITALS] is ignored.

CONTACT PERSON: [NAME], [ROLE, e.g. Treatment Coordinator]
PHONE: [PHONE NUMBER]
EMAIL: [EMAIL]
BOOKING LINK: [PASTE LINK]
PAYMENT OPTION 1: [e.g. Pay upfront, 5% off the total]
PAYMENT OPTION 2: [e.g. Payment plan over 12 months, subject to approval]
CLOSING: [Warm regards or Kind regards]

HOW TO WRITE THE PRESENTATION
- Use only the consult, treatment plan, session images and the details above. Never make up diagnoses, options, dates, fees, providers or links.
- Lead with the patient's goals and concerns, then what was found, then the options, then the investment. Explain why treatment matters before showing any fees.
- Leave out any section with nothing real to show, including its heading and widget.
- Fill each widget using the blue box just above it. Don't write widget content as plain text.
- Prices come from the treatment plan only. Never estimate or round.
- Payment plans: show only the payment options listed above. Work out amounts from the treatment total only when a percentage or number of months is given.
- No tooth numbers outside the Treatment options and Investment widgets. Describe teeth the way a patient would.
- Only include a link if it's filled in above. If a link is blank or still in [CAPITALS], don't mention it.
- In Next Steps, invite the patient to contact the contact person above, with their name, role and phone, and add the booking link.

SIGN-OFF
End with the CLOSING above (or "Warm regards" if it's blank) and the practice name, e.g.:
Warm regards,
The Bright Smiles Dental team
Adding your details here makes sure every presentation uses the right contact person, payment options and sign-off. Each template keeps its own details, so if something changes, update it in each template you use.
CoTreat's Case presentation already includes these sections: Where You Are Now, Your Roadmap, Your Options, Your Investment and Payment Options, plus an instruction to add extra slides when a case needs them. Your presentations will now work. The next steps make them sound like you.
Making It Sound Like You
Paste this into Tell CoTreat how it should read at the top, and change any wording to match how your dentists talk to patients. It adapts each presentation to how the patient came across in the consult.
Write as the treating dentist speaking to the patient, like a warm conversation continuing after their appointment. Calm, confident and plain English, with short sentences and paragraphs. Use the dentist's own words from the consult. Focus on the patient's goals and how treatment helps them. Never salesy or pushy.

Match how the patient came across in the consult:
- Nervous, or mentioned a bad past experience: be extra reassuring and explain what happens at each step.
- Worried about cost: be clear about the investment and payment options, and focus on value. No pressure.
- Asked lots of detailed questions: explain the reasons behind the recommendation and how the options compare.
- Short on time or wanted the bottom line: keep it brief and lead with the recommended option and next step.
- Chatty and upbeat: be warm and encouraging, and focus on how they'll look and feel.
Base this only on what the patient said and how they responded. Never label the patient or mention their personality.
The patient styles are based on the DISC communication styles. CoTreat picks up the cues from the consult, so you don't need to tell it which style each patient is.
Adding Recommended Sections
Add these two sections for a stronger presentation. For each one, hover where it should go, click +, add a Heading, then an Instruction (blue box) under it, and paste the text.
Your Treatment Preview
Heading: Your Treatment Preview (put it after Where You Are Now)
Only include this section if an image was generated in this session. If there isn’t one, leave the whole section out.

Image prompt (fill in the brackets from the consult):

“Generate a realistic preview of [treatment] on [teeth or area], showing [the change discussed], change only the teeth listed. Keep the patient’s anatomy, other teeth, gum line, framing and lighting the same as the reference photo. ”

Use the main treatment that changes how the smile looks.
If several treatments were discussed for the same area, combine them in the one prompt.
Use only what was discussed. If a detail like the shade or shape wasn’t mentioned, keep it natural.

Layout:

Above the image, write 1–2 warm sentences linking it to the patient’s goals.
Label the image with the treatment and teeth, e.g. Veneers: 11, 21.
Below the image, add: AI-generated preview: a visual guide to your treatment, not the exact final result.
Next Steps
Heading: Next Steps (put it at the end)
This is the next steps section.
- Give 2–3 short numbered steps, e.g. have a read and note any questions, then contact the contact person from My Practice Details to book or chat through options.
- Show the contact person's name, role and phone number, and the booking link if filled in.
- Add a short, warm line linking back to the patient's goals.
Using Widgets
Widgets are ready-made visual sections that CoTreat fills in for each patient. The Case presentation template already includes them.
- Treatment options: the options side by side, with the recommended one marked.
- Roadmap: the visits or phases ahead, step by step.
- Investment: itemised fees and the total, from the treatment plan.
- Payment plans: ways to pay, using the payment options in your setup box.
Keep each section in this order: heading, then blue box, then widget. The blue box tells CoTreat how to fill the widget, so if the widget comes first it may not fill in correctly.
For more on widgets, images and editing, see Creating Custom Templates.
Common Questions
Where do the prices come from?
The treatment plan for that session. CoTreat never estimates or rounds prices.
Can I show the patient's photos or X-rays?
Yes. Ask for them in a blue box, e.g. "If the dentist mentioned a bitewing, include the most recent one." Generated images, like smile previews, go in Your Treatment Preview.
Can I have different presentations for different treatments?
Yes. Set up one fully, then use Make my own copy for others, such as implants or clear aligners.
If my details change, do I need to update every template?
Yes. Each template keeps its own details in its top blue box, so update each one you use.
What's the difference between a case presentation and a patient letter?
A case presentation is a fuller proposal with options, a roadmap and costs. A patient letter is a short summary for any visit. See link: Customising Your Patient Letter Template
Getting Help
Stuck, or have feedback or a feature request? We'd love to hear how your templates are working and what you'd like to see next.
- Click the Help icon in CoTreat and select Contact Support, or
- Email help@cotreat.com.au